Want to pump some air and life into your recordings? Try mic'ing some instruments in stereo with two microphones. To create a stereo effect, the mics can be angled apart, spaced apart, or both. In this article we'll look at several techniques for recording in stereo. Normally, we put a single mic on an instrument, record it, and pan its track somewhere between our two monitor speakers. Then we get a sense of where each instrument is — left, center, half-right, whatever. But pan-potted mono tracks are not the same as true stereo. Stereo mic'ing captures an instrument, or an entire ensemble, with two mics. It gives a sense of depth and ambience that adds a lifelike quality to a recording. And if you record the members of an entire musical ensemble in stereo, they sound like they're in a shared space. In fact, you can set up a stereo pair of mics in a live room, and do stereo overdubs. Place each instrument you want to overdub in a different location and record it in stereo. When you mix the stereo overdubs, the mix will sound like a group of players in a single room.
Some instruments are point sources, so one mic is usually enough to record each one: saxophone, guitar amp, electric bass, lead vocal. But some instruments are larger. These instruments benefit from being recorded in stereo: a drum kit, piano, horn section, string section, Leslie organ speaker, choir or background singers, vibes, acoustic guitar, even a small jazz group or folk combo.
But how about the electric guitar or other amplified instruments? If you use two mics to record two separate, identical guitar amps, you'll get a mono image in the center between your monitor speakers. That's because there's no difference in the signals in both channels. Instead, try running the guitar through a guitar amp (recorded on the left channel) and through a Leslie organ speaker (recorded on the right channel). You'll get a swirling, spacious effect.
Stereo Imaging
Traditionally, stereo mic techniques are used to record classical-music ensembles and soloists, including the concert-hall acoustics. During playback of a stereo recording, you hear images of the musical instruments in various locations between your stereo speakers. Ideally, these images are in the same places, left-to-right, that the instruments were at the recording session.
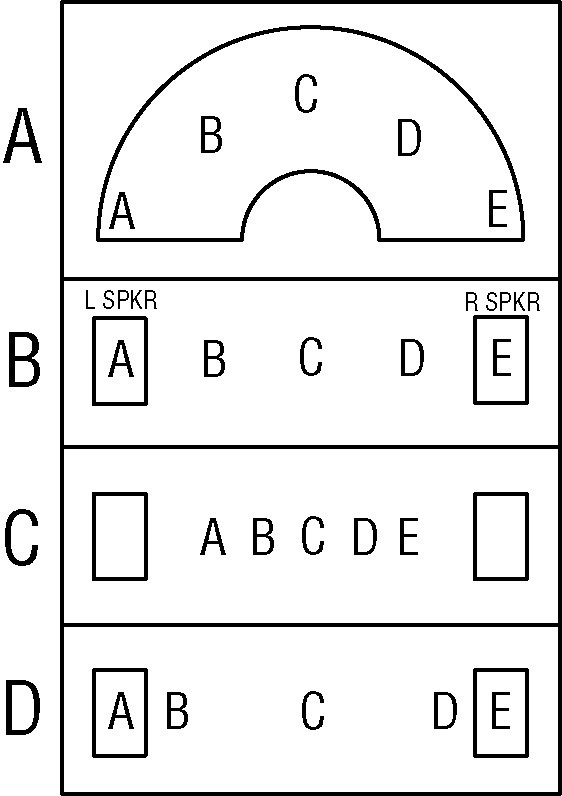
Figure 1 shows three stereo localization effects. In Figure 1A, various instrument positions in an orchestra are shown: left, left-center, center, right-center, right. In Figure 1B, the reproduced images of these instruments are accurately localized between the stereo pair of speakers. The stereo spread or stage width extends from speaker to speaker. If the mics are placed improperly, you hear either a narrow-stage effect (Figure 1C) or an exaggerated-separation effect (Figure 1D).
To judge these stereo localization effects, it's important to sit as far from the speakers as they are spaced apart. You should be the same distance from each speaker. Otherwise, the images will shift toward the side on which you're sitting and will become less sharp. Also, place the speakers several feet from the walls and put some foam on the wall behind them. This delays and weakens early reflections, which can degrade stereo imaging.
Here's a way to check the stereo imaging of a mic technique:
1. Set up the stereo mic array in front of a stage.
2. Record yourself speaking from various locations on stage where the instruments will be — center, half- right, far right, half-left, far left. Announce your position.
3. Play back the recording over speakers.
4. If you hear a narrow stereo spread, angle or space the mics farther apart. If you hear exaggerated separation, angle or space the mics closer together.
Types of Stereo Microphone Techniques
Four general mic techniques are used for stereo recording: coincident pair, spaced pair, near-coincident pair, and baffled-omni pair or artificial head.
Coincident Pair
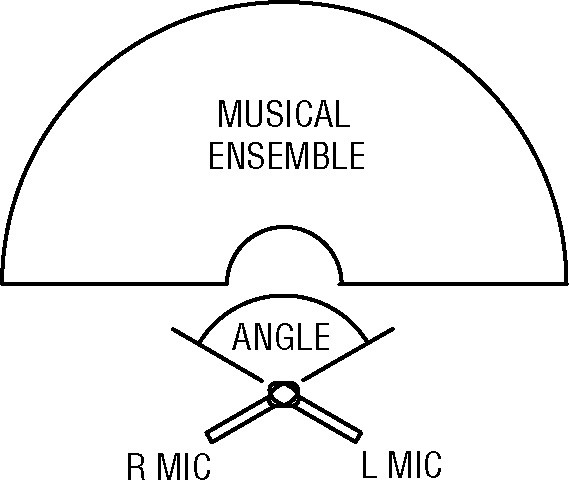
With the coincident-pair method (XY or intensity stereo method), two directional mics are mounted with grilles nearly touching and diaphragms one above the other, angled apart to aim roughly toward the left and right sides of the ensemble or instrument (Figure 2). For example, two cardioid microphones can be mounted angled apart, their grilles one above the other. Other directional patterns can be used, too. The greater the angle between microphones, and the narrower the polar pattern, the wider the stereo spread. A typical angle is 90 to 120 degrees.
The coincident array codes instrument positions into level differences (voltage differences) between channels. During playback, the brain decodes these level differences back into corresponding image locations. A pan pot in a mixing console works on the same principle. Listening tests have shown that coincident cardioid mics angled 90 degrees apart tend to reproduce the musical ensemble with a narrow stereo spread. That is, the reproduced ensemble does not spread all the way between speakers. A drum set mic'ed this way sounds almost mono. A coincident-pair method with excellent localization is the Blumlein array, which uses two bidirectional mics angled 90 degrees apart.
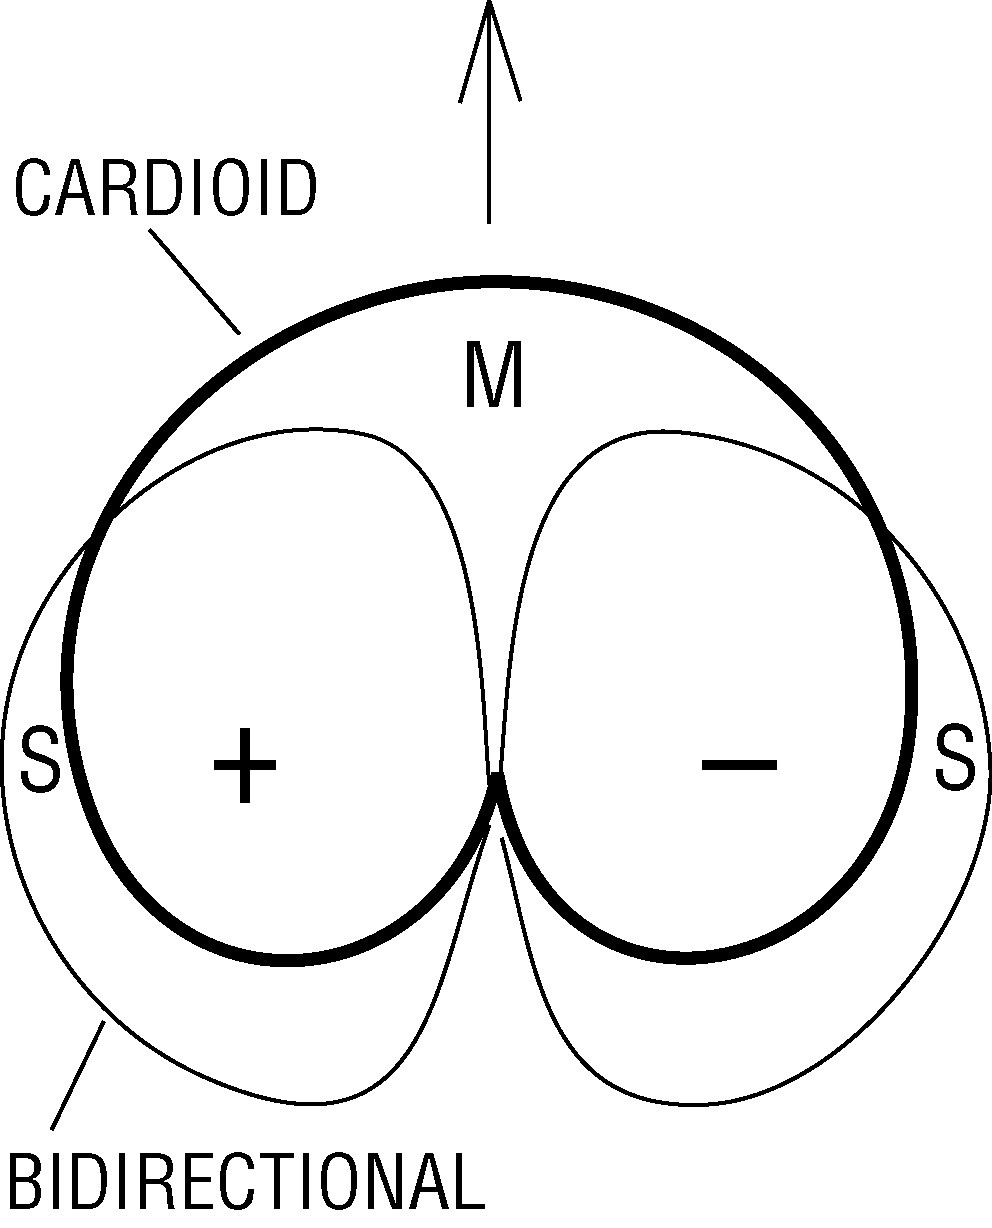
A special form of the coincident-pair technique is the mid-side (MS) recording method shown in Figure 3. A mic facing the middle of the sound source is summed and differenced with a bidirectional mic aiming to the sides. This produces left- and right-channel signals. With this technique, the stereo spread can be remote- controlled by varying the ratio of the mid signal to the side signal. This remote control is useful at live concerts, where you can't physically adjust the microphones during the concert. MS localization accuracy is excellent.
A recording made with coincident techniques is mono-compatible, meaning the frequency response is the same in mono or stereo. Because of the coincident placement, there is no time or phase difference between channels to degrade the frequency response if both channels are combined to mono. If you expect your recordings to be heard in mono (say, on radio or TV), you should consider coincident methods.
Spaced Pair
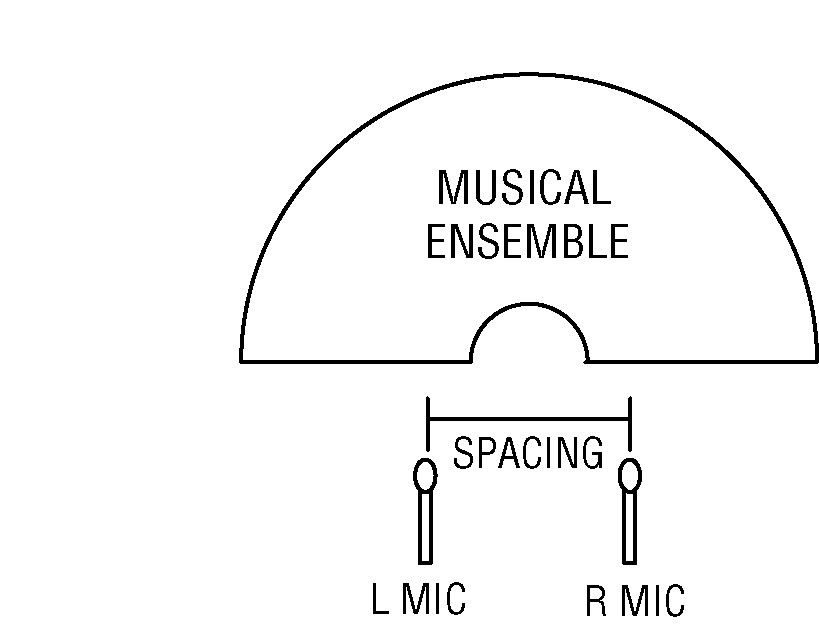
With the spaced-pair (or A-B) technique, two identical mics are placed several feet apart, aiming straight ahead toward the musical ensemble or instrument (Figure 4). These mics can have any polar pattern. The greater the spacing between mics, the greater the stereo spread.
Instruments in the center of the ensemble produce an identical signal from each microphone. During playback of this recording, you hear an image of the center instruments midway between the stereo pair of loudspeakers. The spaced-pair array codes instrument positions into time differences between channels. These time differences create the image locations between your monitor speakers. The spaced-pair method tends to make off-center images unfocused or hard to localize. This method is useful if you prefer the sonic images to be diffuse or blended, rather than sharply focused. Also, the large time differences between channels corresponds to gross phase differences between channels. Combining both mics to mono sometimes causes phase cancellations of various frequencies, which may or may not be audible. Spaced mics are said to provide a warm sense of ambience. That's because the two channels of recorded reverberant sound have random phase relationships, which gives a diffuse or spacious effect. With the spaced-pair method, you can use omni condenser mics. This type of mic has a more extended low-frequency response than a unidirectional condenser mic and tends to have a smoother response and less off-axis coloration.
Near-Coincident Pair
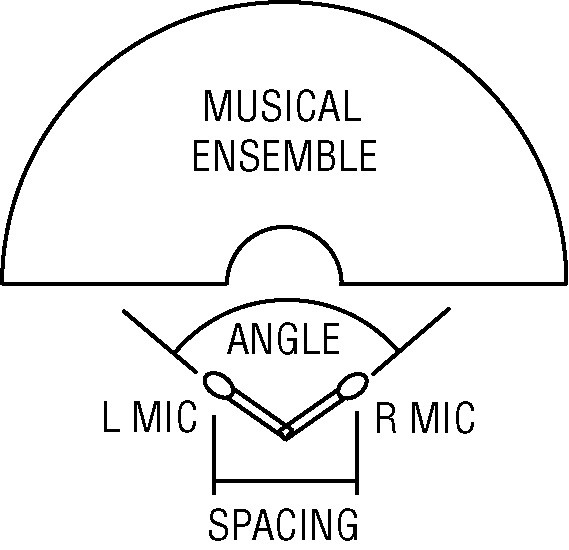
As shown in Figure 5, the near-coincident technique uses two directional microphones angled apart, with their grilles spaced horizontally a few inches apart. Even a few inches of spacing increases the stereo spread and adds a sense of depth and airiness to the recording. The greater the angle or spacing between mics, the greater the stereo spread.
Angling directional mics produces level differences between channels; spacing mics produces time differences. The level differences and time differences combine to create the stereo effect. If the angling or spacing is too great, the result is exaggerated separation. If the angling or spacing is too small, the result is a narrow stereo spread. A specific near- coincident method is the ORTF system, which uses two cardioids angled 110 degrees apart and spaced seven inches (17 cm) apart horizontally. (ORTF stands for Office de Radiodiffusion Television Française — French Broadcasting Organization.)
This method tends to provide accurate localization; that is, instruments at the sides of the orchestra are reproduced at or very near the speakers, and instruments halfway to one side tend to be reproduced halfway to one side.
Baffled-Omni Pair
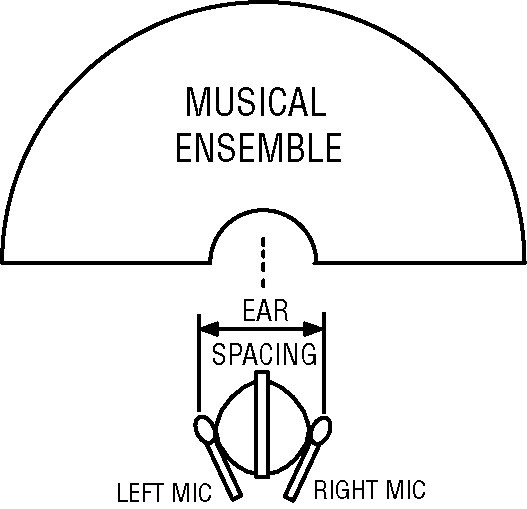
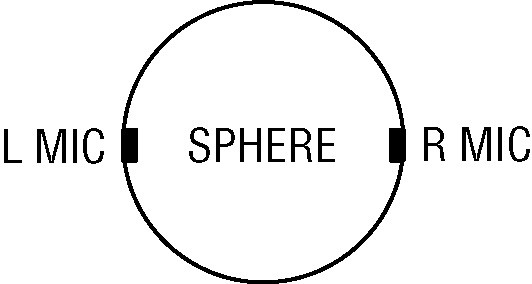
With this method, two omnidirectional mics are separated a few inches by a baffle between them. The baffle is a hard disk covered with absorbent foam (as in the Jecklin disk, Fig. 6). Or the baffle is a hard sphere with the mics flush-mounted on opposite sides (as in the Neumann, Schoeps and THE spherical mics, Fig. 7).
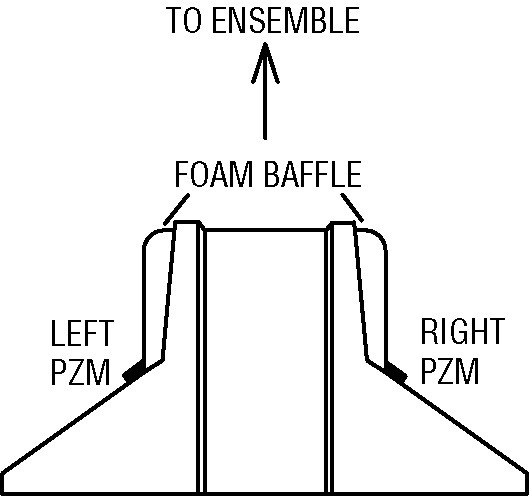
Another format uses two Pressure Zone Microphones, ear-spaced on angled boundaries, with a foam baffle between the mics (as in the Crown SASS-P MKII — Fig. 8). You can even tape a couple of mini omni mics onto glasses, with each mic on either side of your head near your ears. To compensate for the acoustic effect of the head, this setup needs some EQ (a broad dip around 3 kHz). With the baffled-omni pair, the level, time, and spectral differences between channels create the stereo images. The omni condenser mics used in this method have excellent low-frequency response.
Comparing the Four Stereo Mic'ing Techniques
The coincident-pair technique has the following features:
It uses two directional mics angled apart with grilles nearly touching, one mic's diaphragm above the other.
Level differences between channels produce the stereo effect.
Images are sharp.
Stereo spread ranges from narrow to accurate.
Signals are mono-compatible.
The spaced-pair technique has these features:
It uses two mics of any polar pattern spaced about two to 12 feet apart.
Time differences between channels produce the stereo effect.
Off-center images are diffuse.
With wide spacing, the stereo spread tends to be exaggerated unless a third center mic is mixed in.
It provides a warm sense of ambience.
The near-coincident-pair technique has these features:
It uses two directional mics angled apart and spaced about seven to 11 inches apart.
Level and time differences between channels produce the stereo effect.
Images are sharp.
Stereo spread tends to be accurate.
It provides a greater sense of "air" and depth than coincident methods.
The baffled-omni-pair technique has these features:
It uses two omnidirectional mics about seven inches apart, separated by a baffle.
Level, time and spectral differences between channels produce the stereo effect.
Images are sharp.
Stereo spread tends to be accurate.
Low-frequency response is excellent.
Mounting Hardware and Matched Mics
A handy device is a stereo mic adapter or stereo bar. It mounts two mics on a single stand, and lets you adjust the angle and spacing between the mic pair. For sharp imaging, the microphone pair should be well matched in frequency response and polar pattern. Be sure both mics are the same model number, and match their levels when picking up a sound source in the center. Or use a stereo mic, which mounts two mic capsules in a single housing for convenience.
Each stereo mic technique has its advantages and disadvantages. Give stereo mic'ing a try, and you'll be rewarded with an enhanced sense of air and realism in your tracks.


