Most engineers would probably agree that recording a drum kit is one of the most challenging studio tasks. The popularity of sampled drums and drum replacement software is a testament to the facts that: 1. Recording live drums may be a dying art, and 2. It can be a pain in the arse. Like any recording, success begins at the source — obtaining a high-quality recording is a struggle when you start with a source that sounds bad. Engineers obsess over mic selection and placement and which mic/preamp combination will deliver that magic kick or tom sound (and we should obsess), but the real difference in drum recordings happens before you plug in a single cable. What follows is a discussion of how you can tweak a drum kit for maximum performance so that you can start at a higher level and use your technology to capture and enhance the sound of a drum kit, as opposed to making attempts to correct deficiencies in an inferior instrument. In most cases these tweaks are inexpensive, so there's no excuse not to have a tricked-out kit in your studio.
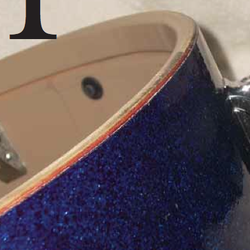
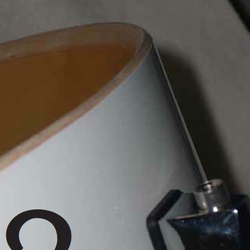
Perhaps the most important asset of any drum is its bearing edge. This is the part of the drum shell upon which the head rests. In the old days (let's say before the 1970s), bearing edges on wood shell drums were round and wide (see photo 1). Toward the end of the 1970s, bearing edges became "sharper" and narrower (see photo 2). The two approaches yield distinct sonic differences, yet both are critical to the health of the drum. The function of the bearing edge is akin to the bridge of a guitar or violin: Support a vibrating element without impeding motion of that element. If the bridge of a guitar does not support a string properly, you might hear a buzz or a rattle when that string is plucked. Defective bearing edges yield similar results, so it's extremely important to make sure that the bearing edges of each drum (top and bottom) are "true," meaning that they are not deformed. You can check this quite easily. Remove the rims and heads and lay the drum on a flat piece of glass. Take a plain piece of writing paper and slide it against the edge of the drum. The bearing edge should stop the paper from passing between the drum and the glass (the exception is the bottom of some snare drums, which may have "snare beds" cut into them — areas where the edge is contoured to allow string or tape to pull the snares against the bottom head). If you find that the bearing edges are warped, dented or deformed you have two options: Replace the drum or take it to a shop that specializes in re-cutting the edges to make them true. In some cases truing the bearing edges of all of the toms in a set may make them sound more consistent. Also make sure that the drums are not "out of round" — meaning that they have not somehow become oval shaped, which will make tuning very difficult.
Once you are satisfied with the condition of the bearing edges, rub them gently with a household candle, leaving a thin deposit of wax on the edge. This will help the head vibrate a bit more easily, not unlike they way some guitarists put a bit of graphite in the nut.
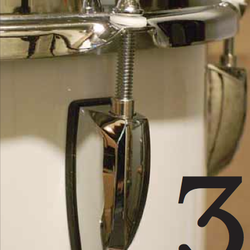
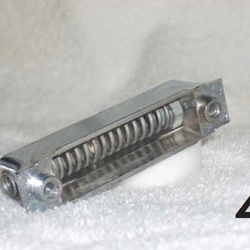
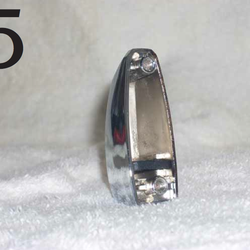
While the drum is open, it's a good time to check the general state of the hardware. All screws and bolts need to be tight to avoid rattle. If you have a vintage drum and you are unsure if the screws can take the torque, replace them with new equivalents and store the old ones in a safe place for collectability. You might want to add lock washers under the screws or bolts to make sure that they don't come loose. The lugs or tension casings are the metal fittings on the outside of a drum into which the tension rods are screwed to hold on the rim (see photo 3). In the old days lugs were threaded to accept the tension rods. Somewhere along the line someone realized that these threads can strip, rendering the lug useless — so the lug insert was developed. This is the small threaded retaining nut that lives inside the lug. If the retaining nut gets damaged, you can replace it without needing to replace the entire lug. Many older tension casings use a spring to force the retaining nut into position so that the tension rod can be screwed into it (see photo 4), and some newer designs use a plastic insert (see photo 5). The net result of either design is play and rattle. Here is where you can lower the "signal-to-noise ratio" of the drum by packing the lugs with cotton or foam rubber. This damps the rattle. Do this on every lug of every drum you own and do the same for fittings that hold tom arms and floor tom legs. Really. Then replace the hardware and tighten down the screws. At this point you might want to add a drop of lubricant to the retaining nuts, but not much — keeping the drum in tune relies upon a bit of friction. Make sure that all lugs and retaining nuts are present and accounted for, and while you are at it, inspect wood shells for cracks or damage that might cause audible problems.
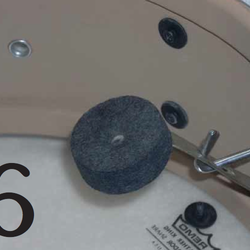
Feel free to remove the device known as a muffler or tone control (photo 6). Mainly seen on older drums, this was intended as a means of reducing overtones (which it can do). Unfortunately the muffler changes the vibrational mode of the head by pushing the head up, while the stick strikes downward, altering the drum's fundamental. The muffler can rattle, so removing them is a good idea.
Now you're almost ready to replace the heads and rims on the drum. Check the rim to make sure that it is not deformed and that the head fits snugly underneath the rim. You may encounter a drum (my Noble & Cooley Alloy Classic comes to mind), where the tolerance of the rims is very tight, and you'll need to work the hoop of the head into the rim (the hoop is the round metal or plastic edge of the head). If you are looking to get more "crack" out of a snare drum, you can replace stamped metal rims with die cast rims, but be sure not to discard any part of a collectable drum.
The tension rods pass through the holes of the rim's flange. Typically there is a metal washer that sits between the tension rod and the rim. Replace these metal washers with nylon or plastic equivalents (visible in photo 3). Metal-on-metal contact here can create noise and plastic or nylon washers will eliminate it. For snare drums you'll need a fairly thick washer, as most drummers torque down the rim of a snare down much harder than they would a tom or bass drum.
While we are not going to dive into the subject of tuning with this article, it is worth mentioning head selection. There is no magic combination of top and bottom heads that works for every set of drums. I've had luck on toms with a coated Remo Emperor on the top and clear Remo Ambassador or Diplomat heads on the bottom, but this is only a starting point (we'll discuss the kick drum later). When you put a new head on a drum it will need to be stretched in one of two ways: 1. Put the head on and tune the drum to a very high pitch. Leave it there for an hour or so and then tune the drum the way you want to hear it; or 2. Set the head on the drum and push down on the head in the middle to stretch it. With some heads you will hear a cracking noise. This is normal and is nothing to worry about.
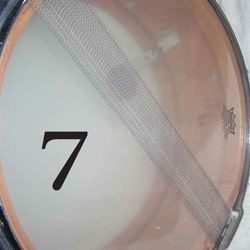
Snares are the long springs stretched across the bottom head of a drum, differentiating a snare drum from other drums (photo 7). They are pulled against the bottom head with string or tape and the throwoff or strainer. It amazes me how many drummers don't have a clue how to adjust snares. First make sure that none of the snare wires are broken or bent, or they will rattle. Check that the snares are pulled evenly and are roughly centered within the diameter of the shell (unless you are dealing with extended snares which exceed the diameter of the drum). If the snares are so loose that they do not touch the bottom head, you get a tom or timbale sound. If the snares touch the bottom head loosely, they will rattle uncontrollably which can create a reverb-like effect (this can sometimes be cool). If the snares are pulled against the bottom head too tightly, then the drum will choke: The snare will not "speak" at softer volumes, and will sound like a tom until struck with a lot of force. Loosen the snares so that they respond to a light touch, but not so loose that they rattle all day long. If you find that the snare drum produces an annoying ping (especially snare drums with metal shells) place a small piece of Moongel or tape a small (2 x 2 inches) square of felt on the head next to the rim and away from the player's side.
That brings us to the kick drum. Try a Remo Powerstroke 3 head on the beater side and a clear or black Ambassador on the front. I suggest leaving the front head on for several reasons. 1. The head and hoop help support any weight that might be loaded on the kick drum (such as the tom holder) and keeps the drum from deforming. 2. If you remove the front head, the drum will have little or no resonance. 3. It keeps the studio cat from nestling on the blanket that you are going to place inside. Ah, the blanket. Moving blanket? Forget it. Too thick and too much. Ditto for the pillow. What we need here is something to damp the head from ringing uncontrollably (unless you are aping a marching band bass drum), while letting the drum speak. Use the smallest blanket, bath towel, pillow or piece of foam that can press up against both heads without impeding motion.
A 6 to 8-inch hole in the front head will allow you to get a microphone inside the drum, but still retain the tone that you need. How to cut the hole? There are products that can help guide your hand with a razor blade, heads pre-cut with holes in them, or you can use my tried and true hole-maker. Take the head into the kitchen and lay it flat (upside down) on a scrap piece of 3/4-inch plywood. Heat an empty coffee can over the burner (hold it with a pliers so you don't burn yourself). Once the can is hot, lay it on the head and push down. It will burn a perfect circle into the head and cauterize the edge in the process (Tape Op holds no responsibility for possible injury).
Try tuning both heads to the same pitch, but do not put too much tension on the heads. The front head in particular should flop around a bit. When you place your hand in front of the hole and someone plays the drum you should feel air moving. If not, you've either stuffed the drum too much or tuned it too high — both of which reduce the amount of bottom end your microphone is going to hear. A trick you can use to drop the pitch a bit is to tape a quarter to either head approximately halfway between the beater and the rim. This will slow the vibration of the head, thus dropping the pitch. Do not confuse this with placing a quarter on the beater head at the point of impact, which is a trick intended to give you more smack attack when the beater hits the head. Felt beaters yield the least smack, while plastic and wood beaters yield more. If you'd like to protect the head from getting dented, use a Remo Falam Slam Kevlar pad on the head at the impact point.
While you're at it, listen carefully to the bass drum pedal for noises or squeaks that could show up in a recording. Most pedals manufactured these days are fairly quiet, but if you run into a drummer who still has a Ludwig Speed King, good luck. You'll never get the squeak out of a Speed King. That squeak you hear on Led Zeppelin records (check the intro to "All My Love") was not an oversight. It was inherent in the pedal. The entire kit (or at the very least, the seat, kick drum, kick pedal and hi- hat) should be placed on a rug or carpet. The heel of a kick pedal and the hi-hat stand are constantly in motion and will produce a ton of noise on a hardwood floor.
Cymbals and cymbal stands can make your life miserable. The big offender here is metal hardware at the stem of the stand, upon which you place the cymbal. Take a look at photo 8. It shows a metal cup washer on the stand. On top of the cup washer is a felt, which isolates the washer from the cymbal, but this washer is probably going to rattle against the stem even after you place the felts on it. Furthermore, the motion of the cymbal against the stem is going to produce unwanted noises as well as creating excess wear on the cymbal's hole. Felts should be placed underneath and over the cymbal to constrain some motion, but do not put a lot of felts and then tighten the cymbal nut down so hard that it restricts motion. This is not only bad sonically, but it can result in the cymbal cracking at the hole or near the bell. At the very least cover the stem with something such as surgical tubing (which you can get cheap at a medical supply shop). This protects the cymbal and reduces noise. The next step is to use a plastic "T" top to replace the metal wing nut at the top of the stem (photo 9). If you want to step it up a notch, go with a combination cup washer/sleeve such as shown on photo 10. This eliminates all metal on metal contact and protects the cymbal as well.
Hi-hat hardware can also be guilty of creating noise, but it's a bit more difficult to cure. Lubricating moving parts so that they don't squeak is relatively easy, but negating metal-to-metal contact on the top cymbal is going to be difficult. The device that holds the top cymbal is known as the clutch. You can try heat shrink tubing over the clutch to keep it from scraping against the cymbal hole, but it tends to wear quickly. Hi-hat felts get smashed down easily, so you can replace them with rubber bushings, such as you might find in a skateboard shop, but beware: if the bushings don't have any give, you run the risk of cracking the cymbal, particularly if it is a thin weight.
All of these techniques are designed to fine-tune the performance of your drum set. You may be surprised at the manner in which the noise floor drops once you've employed some of these suggestions. Perhaps more importantly, you'll find that you need less time to dial in a good drum sound. That's because you've improved the source, and when the source sounds good, making a successful recording becomes much easier.
Steve La Cerra is an independent engineer based in the New York area. He is currently the front-of-house engineer for Blue Öyster Cult and may be reached at stevelacerra@verizon.net




_display_horizontal.jpg)
